How to roll a joint – Smoking joints is one of the most popular ways to use cannabis. Rolling a joint is part of the social aspect of using cannabis, and learning to move the old-fashioned way is a cultural initiation for many. Rolling a collective can be a very personal and complex job, but any new smoker can proceed on their own with a few simple steps. Read on to learn more about the art of rolling a joint.
Table of Contents
What is a Joint?
A joint is a cannabis cigarette that is usually hand-rolled by an individual. However, some dispensaries offer pre-rolls or rolled joints in the store, which consumers can purchase, saving them a few steps. A cannabis joint that includes both cannabis and tobacco is called a joint, while a hollowed-out cigar filled with cannabis is a joint. Blunts can also make by rolling cannabis in dark, thick tobacco paper used for cigars.
What do you need to Roll a Joint?
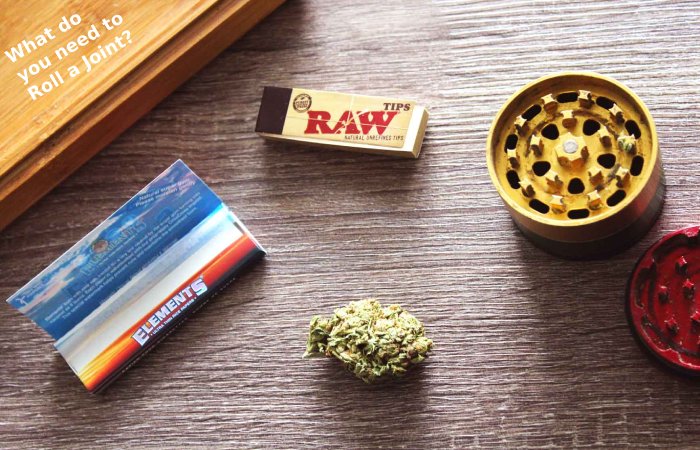
To roll a cannabis joint, you will need to gather a handful of essential materials:
- Cannabis, typically about a third of a gram per joint
- Crusher
- Rolling tray
- Rolling papers (below)
- Filter or kickstand, or material to make one (down)
- Stick, pen, or similarly shaped object
How to Roll a Joint?
Step 1: Grind the Cannabis
Use a grinder to divide and evenly grind the flower. A grinder produces uniform size and texture, resulting in a smoother, more uniform smoke. If you don’t have a grinder, spread the heads apart with your fingers. Then, work carefully to minimize damage to the cannabis trichomes by removing the stems or seeds and making pieces roughly the same small size.
Step 2: Make a Crutch
Many tobacco stores sell pre-made crutches to serve as a spout for a joint. While crutches are not essential, they help strengthen the mouthpiece and make it easier to grip a joint. Crutches also increase airflow through a joint and minimize the risk of burning your lips or inhaling small pieces of marijuana during a stroke.
To make a crutch, take a piece of thick paper or cardstock and cut a strip in the shape of a rectangle about half an inch wide (¾ inch if you are using king-size paper). Fold most of the form into an accordion shape, then wrap the last piece of paper around the accordion part. Business cards work great for making crutches. Glass and wood crutches are excellent alternatives to form and can find in tobacconists, headwear stores, and some dispensaries.
Crutches are also called filters or tips. Some people call them cockroaches, but a cockroach is the last charred piece of a smoked joint.
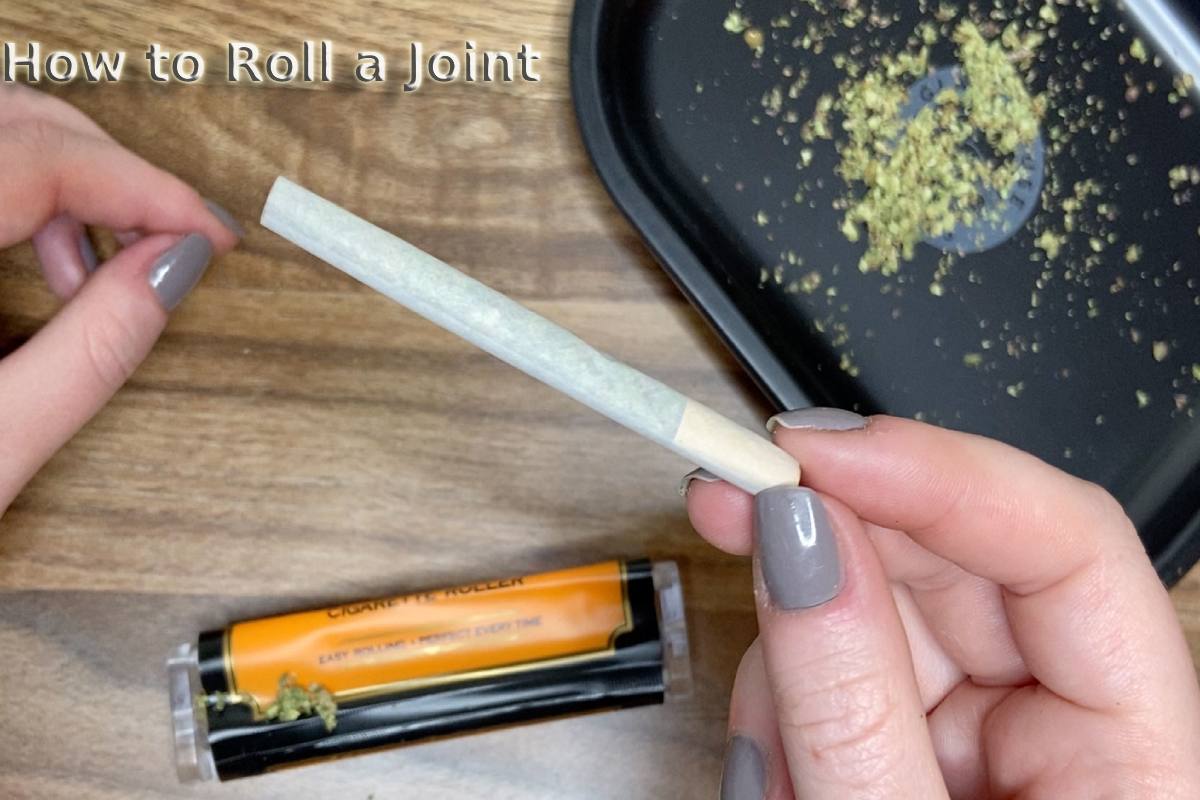
Step 3: Load the Stamp
Place the rolling paper in the tray with the sticky side facing out. Place the crutch where you want the mouthpiece and sprinkle marijuana on the paper in a column aligned with the crutch. Distribute the flower evenly throughout the joint and avoid overfilling it.
To roll a tapered joint, spray less grass near the spout and more toward the tip, tapering off as you move.
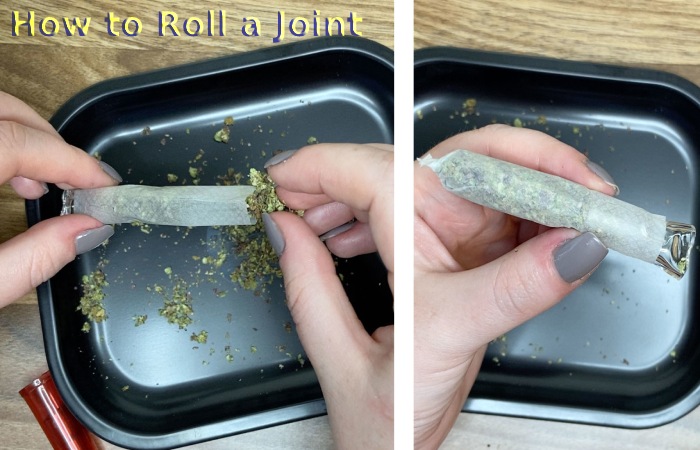
Step 4: Roll the Joint
It’s finally time to start. Make sure the sticky side of the paper is away from you, and pick up the cannabis-filled document. Use your thumb and index finger to touch the piece into a tack shape, sifting the paperback and forth to spread the bud evenly and pack it up a bit. It’s okay if a flower falls, you can fill it in later. Work the grass into a cylinder shape, not too loose to burn unevenly and not too tight to restrict airflow.
Tuck the non-stick side of the rolling paper over the grass and roll it slowly to the sticky side, tucking in the yolk as you go. Use your thumbs to move and your index fingers to support the outside. Lick or wet the sticky adhesive and create at the end of the nozzle to slowly seal the joint.
Once it’s sealed, grab a wand, pen, or other long cylindrical objects to tamp the cannabis into the mouthpiece. This is where you can recover the grass lost during the break-in phase.
Step 5: Seal the Deal
Twist the extra paper on the tip of the gasket to seal everything.
Finally, it’s time to light up your joint and inhale through the mouthpiece. Enjoy!
Tips for More Effortless Joint Rolling
Please choose the right paper size: While it may be tempting to start with the king-size first because it seems easy to handle, it’s too much. A single-width is the same problem at the opposite end of the spectrum. Most experts recommend starting with 1¼ inch paper until you feel comfortable.
Think deeply: Joint bearing fans can choose any paper they want and roll the perfect doobie. But when you are starting, go for thicker paper. A hemp is a great option. Then, after a bit of practice, you can move on to something so delicate that it’s almost invisible.
Start with the crutch: Hold the end of the filter firmly between your index finger and thumb. This gives the whole thing stability, puts the hand in the correct position, and provides a good starting point for packing.
Slow down your roller: Before you ride, take a moment to look at the row of cannabis on the paper. Is it evenly distributed? Did you rock the paper back and forth to wrap it up a bit? Otherwise, take a moment to adjust before you start riding.
Don’t sign up too early: You don’t need to lick and seal immediately after rolling. If you moved and the joint doesn’t fit you, roll it out and try again. Even if you squander the paper and need another, it’s better than crumbling everything while you smoke or walk past.
Lick it lightly: When you are ready to seal your joint, there is no need to drool all over or, God forbid, but the entire joint in your mouth. Instead, just a little moisture along the glue strip will seal the joint well.
Turn and push: Once you’ve wrapped your cannabis joint and rolled it up well, give the paper a little twist at the open end and light pressure. This will seal the bud and make sure it will wrap to light up well when you light it.
Practice: As with everything, it takes a bit of a course to roll the perfect joint. Don’t be afraid to sit with papers and move around until it feels more natural to you. Maybe you will give it a try on your own before offering to shoot for a crowd. Have a little patience, and you’ll be making typical art in no time.