
Table of Contents
Salt Dough Ornament

Salt dough ornament is the perfect Christmas craft and activity for your kids. Make them to give as gifts or to hang on your tree. We will walk you through our easy salt dough ornament recipe and answer any questions about making salt dough!
How to Make Salt Dough Ornament?
One Step
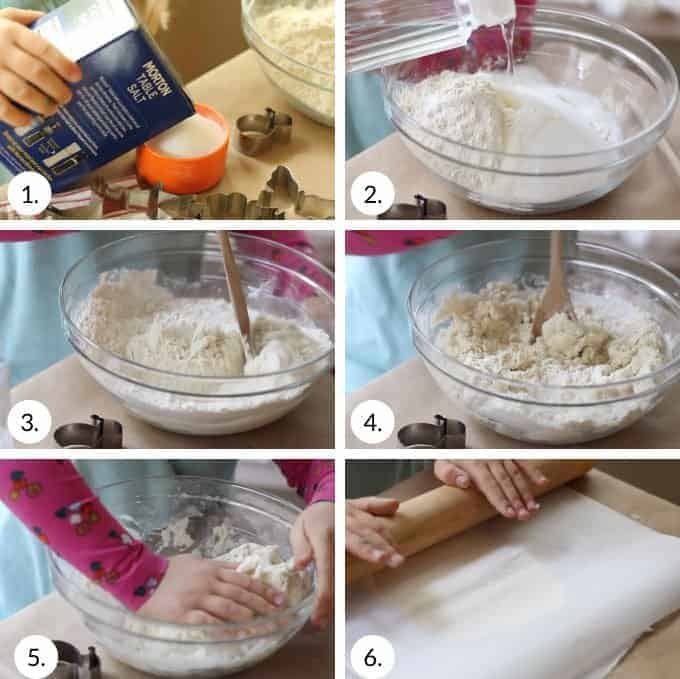
Flour and salt, add to a mixing bowl, and mix well.
Two Steps
Gradually add the water. Mix first with a wooden spoon and then with your hands. You may not need all the water, so keep an eye on the mixture as you add it. If the salt dough mixture seems too dry, add more water. Similarly, if the dough seems too wet, add more flour.
Three Steps
Knead the salt dough with your hands for a few minutes until it becomes soft and pliable.
TIP: If you have any cuts or scratches on your hands, you may want to wear protective gloves to mix and knead the salt dough. The salt in the dough will cause the scratches to sting a little – it’s not too bad, but I’m telling you just in case.
Four Steps
Roll out the dough onto a floured surface. I used the same DIY thickness guides to make my air-dry clay ornaments. Place the guides on either side of the dough ball and roll it out as if you are rolling pastry for a pie.
You can stop the dough once the rolling pin glides along the thickness guides. You will find that the dough is the same thickness all around.
Five Steps
Use your cookie cutters to cut out many salt dough ornaments. You can also use odd bits of dough to make embellishments.
For example, I made some buttons and a scarf for one of my gingerbread men. To make the buttons, I rolled three pieces of dough into small balls and pressed them gently onto the gingerbread man. I did the same for the scarf, rolling out two pieces of dough with my fingers and pressing them into place.
Six Steps
Make holes in the salt dough ornaments to hang on the Christmas tree or add them to gifts. To make holes in large ornaments, you can use a metal straw. Use the lid of an eyeliner pen or something similar for mini ornaments.
Seven Steps
Spread the ornaments onto an oven rack lined with baking/waxed paper and leave to dry. After a day, the salt dough ornaments will already be quite stiff. Remove the wax paper to allow for more air circulation.
How long do Salt Dough Ornaments take to Dry?
Salt dough ornaments take two to four days to dry, depending on the thickness of the dough and the humidity in the room. If you live in a humid climate, you might be better off baking the salt dough in an oven.
If you made salt dough ornaments in summer, you could lay them out to dry in the sun. They dry out quite quickly this way.
Our climate is dry in winter, so I spaced my ornaments out on an oven rack and left them on the dining table to dry. After two and a half days, they were dry enough to paint.
Painting Salt Dough

Now comes the fun part, painting the salt dough ornaments. Here is where your imagination can run wild! If you are doing this project with the kiddos, let them choose which colors to use and allow them to decorate the ornaments however they choose. Decorating is the fun part, after all!
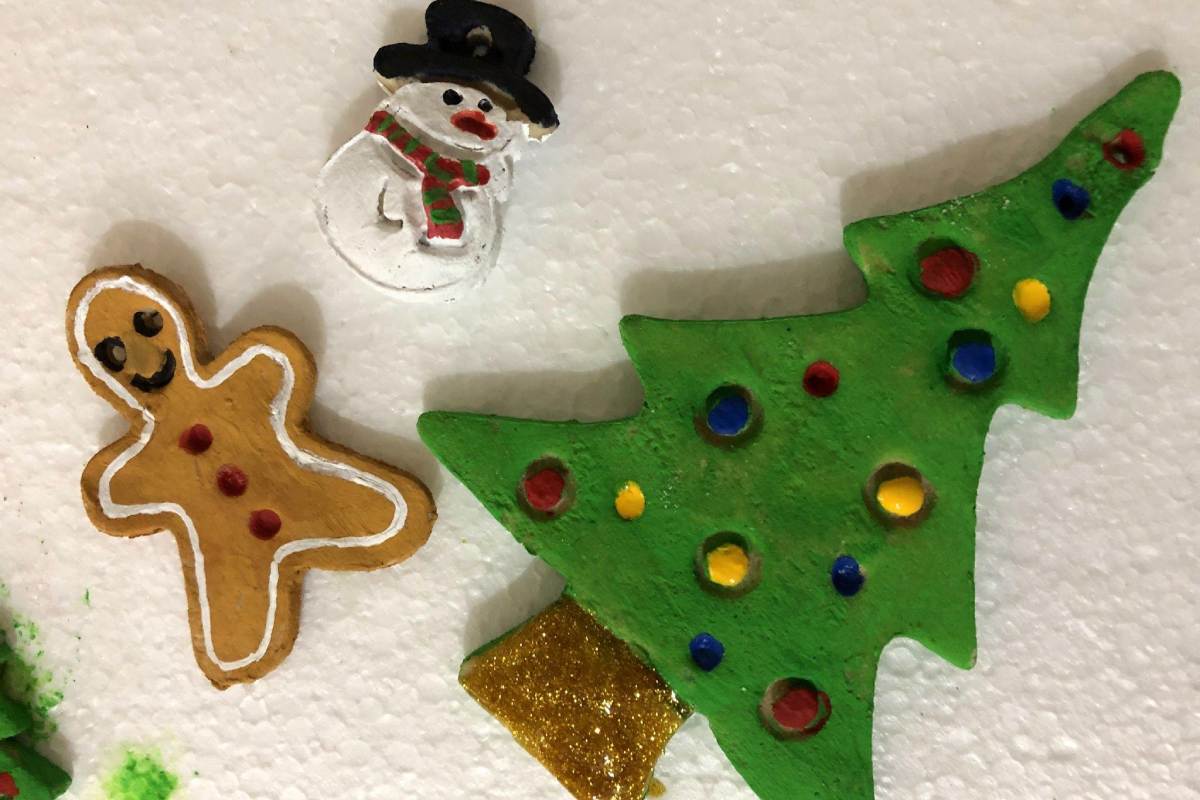
Gingerbread Ornaments
All gingerbread bread ornaments have been given a coat of brown acrylic paint before decorating.
As you can see, I decided to let my gingerbread men go glam this year. I gave the bigger gingerbread man a chic black and gold scarf and buttons. The small gingerbread men had to make do with gold dickie bows, but they still looked cute.
I drew a pattern onto the ornament with a white glass marker pen to decorate the mini gingerbread house. I think these mini gingerbread houses will look great as hangers for homemade gifts or as
Golden Bell Ornaments
I used Deco Art Extreme Sheen acrylic metallic paint for the bell-shaped ornaments. First, I covered the ornaments with some rose gold paint. Then, I outlined the bell and filled it with metallic gold paint. I love how the metallic paint shimmers in the light. These ornaments are going to look beautiful on our tree.
How to Make a Salt Dough Handprint?
It’s so easy to make a salt dough handprint. After rolling out the salt dough, press the hand down evenly into the dough. Use a round cookie cutter to cut out the hand shape. If the handprint is too large for a cookie cutter, cut a round in the dough with a knife. Allow the handprint to dry completely before decorating.
How to Seal Salt Dough Ornaments?
You can use Mod Podge, PVA glue, or spray varnish to seal salt dough ornaments. Some spray varnish is better if you have mini embellishments on your salt dough ornaments, which might dislodge with a paintbrush.
I haven’t yet sealed my ornaments, but I plan to use clear acrylic spray varnish. It’s water-based, dries clear, and safe for toys.
There you have it! Easy salt dough ornaments that the whole family can make. Hang them on your tree, using them as gift tags or decorations in Christmas vignettes. Whatever you do with yours, they will turn out AMAZING!
How Much Salt Dough Do I Need?

If you roll the dough between 1/4” and 1/8” thick, this recipe above will yield 12 to 16 4-inch round ornaments or 16 to 20 3-inch round ornaments.
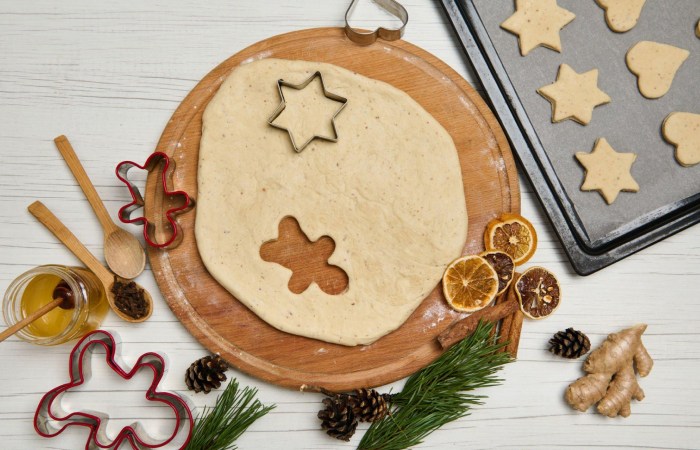
Step 1: Roll Out Salt Dough
When you roll and cut the salt dough, add some extra flour for dusting the surface. Roll a part of the dough on a flat surface dusted with flour. I find the best thickness to roll the salt dough is between 1/4” and 1/8” thick. Dust more flour on the dough as you roll it out if it gets sticky.
Step 2: Stamp and cut Salt Dough Christmas ornaments and Gift Tags
Tip: Sting the ornaments and gift tags first is more accessible, then cutting them to create the best compositions. Stamp the salt dough immediately before the surface forms a crust and dries out for best results. As mentioned earlier, pigment ink is long-lasting and gets better-detailed impressions. Pigment ink doesn’t bleed like dye ink if you want to color the ornaments later.
Step 3: Bake Salt Dough Ornaments and Gift Tags
To prevent your salt dough from puffing up, it’s a good idea to bake it at lower temperatures for longer. Two hundred degrees Fahrenheit ( 93 Celsius) worked best for me. They got puffy when I tried to bake my salt dough ornaments at 235. Depending on thickness, bake the salt dough ornaments at 200 degrees Fahrenheit ( 93 Celsius) for 3-5 hours. Flipping them a few times, especially during the first 2 hours, will help keep them flat with less bulging.
Materials to make Stamped Salt Dough Christmas Ornaments and Gift Tags
Salt dough: see the recipe below. And some Christmas twine to hang your ornaments. You can also color them using watercolors or brush markers.
Stamps and ink pad: I got this set of clear silicone Christmas stamps with six sheets of a nice mix of images and phrases, and these stamping blocks mount the stamps on. A pigment ink pad is preferable on silicone stamps to get better-detailed impressions or if you want to color the ornaments later because pigment ink doesn’t bleed like dye ink would.
Round cookie cutters: This set comes in all sizes from1″ to 4.4″, which is perfect!
Watch it on YouTube.
Suppose you’d like to watch the video presentation on how to make salt dough ornaments, you can see it on YouTube here:
Salt Dough Ornament Recipe
Materials
- 2 cup flour
- 1 cup salt
- Up to 1 cup water (See note below)
Tools
- Mixing bowl
- Rolling pin
- Large Gingerbread man cookie cutters
- Christmas cookie cutter collection
- Metal straw
- Extreme sheen rose gold paint
- Extreme sheen golden paint
- Brown paint acrylic
- White marker pen
- Black marker pen
- White pearls
- Natural Twine
- Gold ribbon optional
- White organza ribbon
Instructions
- Flour and salt, add in a mixing bowl, and mix well.
- Gradually add water. Mix first with a wooden spoon and then with your hands.
- Knead the salt dough with your hands for a few minutes until it becomes soft and pliable.
- Roll out the salt dough onto a floured surface.
- Use your cookie cutters to cut out lots of salt dough ornaments.
- Make holes in the salt dough ornaments with a metal straw.
- Spread the ornaments onto an oven rack lined with baking/waxed paper and leave to dry.
- Decorate with acrylic paints and marker pens.
- Seal salt dough ornaments with Mod Podge or an acrylic spray sealer (optional).
- Thread twine or ribbon through the holes for hanging.
Notes
- Children should supervise when making this craft.
- It may not be necessary to use all of the water. Keep an eye on the mixture as you add it. If the salt dough mixture seems too dry, add more water. Similarly, if the dough seems too wet, add more flour.
- Use odd bits of dough to make embellishments, e.g., scarves and buttons for gingerbread men.
- Air-drying time will vary between 3-5 days, depending on the thickness of the dough and the humidity in the room.
- Yield depends on the scope of the cookies made. The larger the cookie cutter, the lesser the ornaments.
Instructions for Baking
Baking salt dough ornaments in the oven can have a faster drying time.
The oven temperature should be 200F/100C. Baking them at high heat may cause cracking, or the dough may do outside but not inside.
Just like cookies, salt dough ornaments may spread in the oven. Turn them regularly and check that the holes have not ‘baked in.’ Use a metal straw to re-cut the holes during baking if necessary.
FAQ for Salt Dough Ornament
Can you fix cracks in salt dough ornaments?
No. Unlike air dry clay, where you can use slip to fix cracks, salt dough can’t be ‘glued’ back together. It’s best to throw it away if it gets broken.
How long do salt dough ornaments last?
If stored correctly, salt dough ornaments will last for years and years! Remember those salt dough ornaments my boys made when they were twelve? We still had some up until a few years ago. They were still in great shape.
Can you make salt dough ahead of time?
Not really. The salt dough starts to dry out pretty quickly. The recipe is so quick and easy to assemble that making it in advance is no real benefit.
How to store salt dough ornaments?
The ornaments may start to go moldy if stored incorrectly. The best way I’ve found to store salt dough ornaments is to stack them between layers of wax paper in an airtight tin. Painting salt dough ornaments with acrylic paints, then sealing them with Mod Podge or spray varnish once they dry will help preserve them for longer.
Can you bake salt dough ornaments?
Yes. For four to five hours, you can bake salt dough ornaments in the oven on low heat. Baking them at a higher heat may cause cracking, or the dough may do outside but not inside. The oven temperature should be 200F/100C. Just like cookies, salt dough ornaments may spread in the oven. Turn them regularly and check that the holes have not ‘baked in.’ You can use a metal straw to re-cut the holes during baking.
How to tell when the salt dough is done baking?
If the salt dough feels hard when pressed and the color has changed from dark to light, the salt dough ornaments are done baking. Eliminate them from the oven and allow them to cool completely.
Conclusion
This salt dough ornament is a childhood staple, and I love doing this Christmas activity with my kids every year and all year long too! We love making salt dough handprints, ornaments, and sometimes any old-fashioned shape you like. We can do it together and share it as kid-made holiday gifts, keepsakes, or home decor.
Also Read: What is Sea Salt Spray? – Benefits, Uses, and Infographic
Related Searches to Salt Dough Ornament
salt dough ornament ideas
homemade dough ornament
how to make homemade ornaments
how long to bake salt dough ornaments
salt dough christmas decorations
dough ornaments recipe
how to make dough ornament
salt and flour ornaments
salt dough christmas ornaments
homemade dough ornaments
salt ornament recipe
salt flour ornaments
flour and salt ornaments
flour salt ornaments
homemade ornament dough
salt christmas ornament
recipe for salt dough ornaments
diy salt dough ornaments
christmas salt dough ornaments
homemade ornament recipes
salt doigh ornaments
christmas salt dough
salt dough christmas crafts
salt dough decorations
bake ornaments
how long do you bake salt dough ornaments
ornaments recipes
flour ornaments
salt dough christmas
homemade ornaments flour
dough christmas ornaments
christmas dough ornaments
salt dough ornamenta
how to make dough ornaments
decorating salt dough ornaments
homemade christmas ornaments dough
homemade ornament recipe
how to make salt dough ornaments
salt ornaments recipe
how to make ornaments with flour
fancy salt dough ornaments
how to decorate salt dough ornaments
handprint salt dough ornaments
salt.dough ornaments
homemade ornaments dough
dough ornaments
diy handprint ornament
salt dough handprint ornament
salt clay ornaments
baked christmas ornaments
salt dough ornaments handprint
baked ornaments
salt dough handprint
salt dough handprints
flour dough ornaments
recipe for salt dough
easy salt dough ornaments
easy salt dough recipe
salt dough for ornaments
salt dough ornament
homemade handprint ornament
salt dough ornaments
salt dough ornament recipe
no bake salt dough recipe
salt dough recipe
salt dough
dough ornament recipe
salt dough ornaments recipe
salt dough recipe for ornaments
ornament dough recipe
how to make homeade christmas ornaments
baking christmas ornaments
homemade clay ornaments
salt dough recipe no bake
baking ornaments
ornament dough
ornament recipe
homemade ornaments recipe